IoT project
Successfully installing its fleet of IoT sensors
The success of an IoT project depends on how you master the different stages, from thinking about the project to the analysis of the data collected. Among all these stages, deployment and installation represent a significant part.
This involves the implementation in the field of everything that has been thought out and developed, sometimes over several months.
The ROI of an IoT project is based particularly on the ability to no longer have to travel to the field to analyse situations. It therefore seems essential to have correctly deployed its IoT sensors so that they do not become the source of expensive travel.


Site preparation
Radio-mapping
The first step prior to an installation is to get to know your environment. Indeed, the sensors will be positioned in places where it is essential to ensure that the network coverage is sufficient for good communication. This is the radio-mapping stage.
With the help of a network qualification tool such as the FTD (Field Test Device) from adeunis, we will qualify the measurement points and thus check the network coverage in the areas concerned.
This study can make it possible to choose one of the networks in relation to another, to highlight the need for a private network or to define the positioning of its sensors.
Whatever the choice, the radio-mapping phase remains essential. It is the best technical and economic answer to make any IoT project work.
Focus private network / operated network
Private network
Control of network coverage (positioning of the gateway according to the points to be covered)
Control of network costs (gateway, number of points)
Local data management (no need to go through external servers)
- Implementation by an expert
- Start-up investment costs (man time + equipment)
- Network infrastructure maintenance costs (man time + spare parts)
Operated network
- Ready to use
- Network infrastructure managed by the operator
- IoT backend made available by the operators
- Ideal for national or scattered deployments on a territory
- International deployment possible (inter-operator agreements, roaming (when allowed by connectivity))
Dependence on the operator’s network coverage (white areas or end of antenna range)
Costs on large-scale deployment (subscription costs)
Prepare your IoT intervention
During radio mapping or a pre-visit, it is essential to observe the site and gather the information necessary for deployment. A well-prepared intervention beforehand saves a considerable amount of time on site and, above all, allows you to protect yourself against having to “come back”.
Here are a few elements that it is best to be aware of prior to installation:
- Equipment to be interfaced on site (meters, PLC…)
- Retrieve the associated documentation
- Locate systems tosubti interface the equipment and sensor
- Sensors to be deployed on site
- Retrieve and read the user guides
- Learn the intricacies of wiring or sensor configuration.
- On-site installation constraints
- Check the authorisations associated with the site (restricted areas, drilling authorisation, etc.)
- Respect safety constraints (PPE, clearances, etc.)
- Know the typology and location of the site
- Read the recommendations of the radio-mapping report.
- Good availability of the sites to be installed
- Check that the structural work has been completed
- Validate that the equipment to be instrumented is present on site.
- The list of tools required for installation
- Provide the fixing elements for the sensors (Din rail, clamps, etc.).
- Equipment interface cables (6 wires, RJ45, etc.) must be provided.
- Install repeaters to amplify the radio signal.


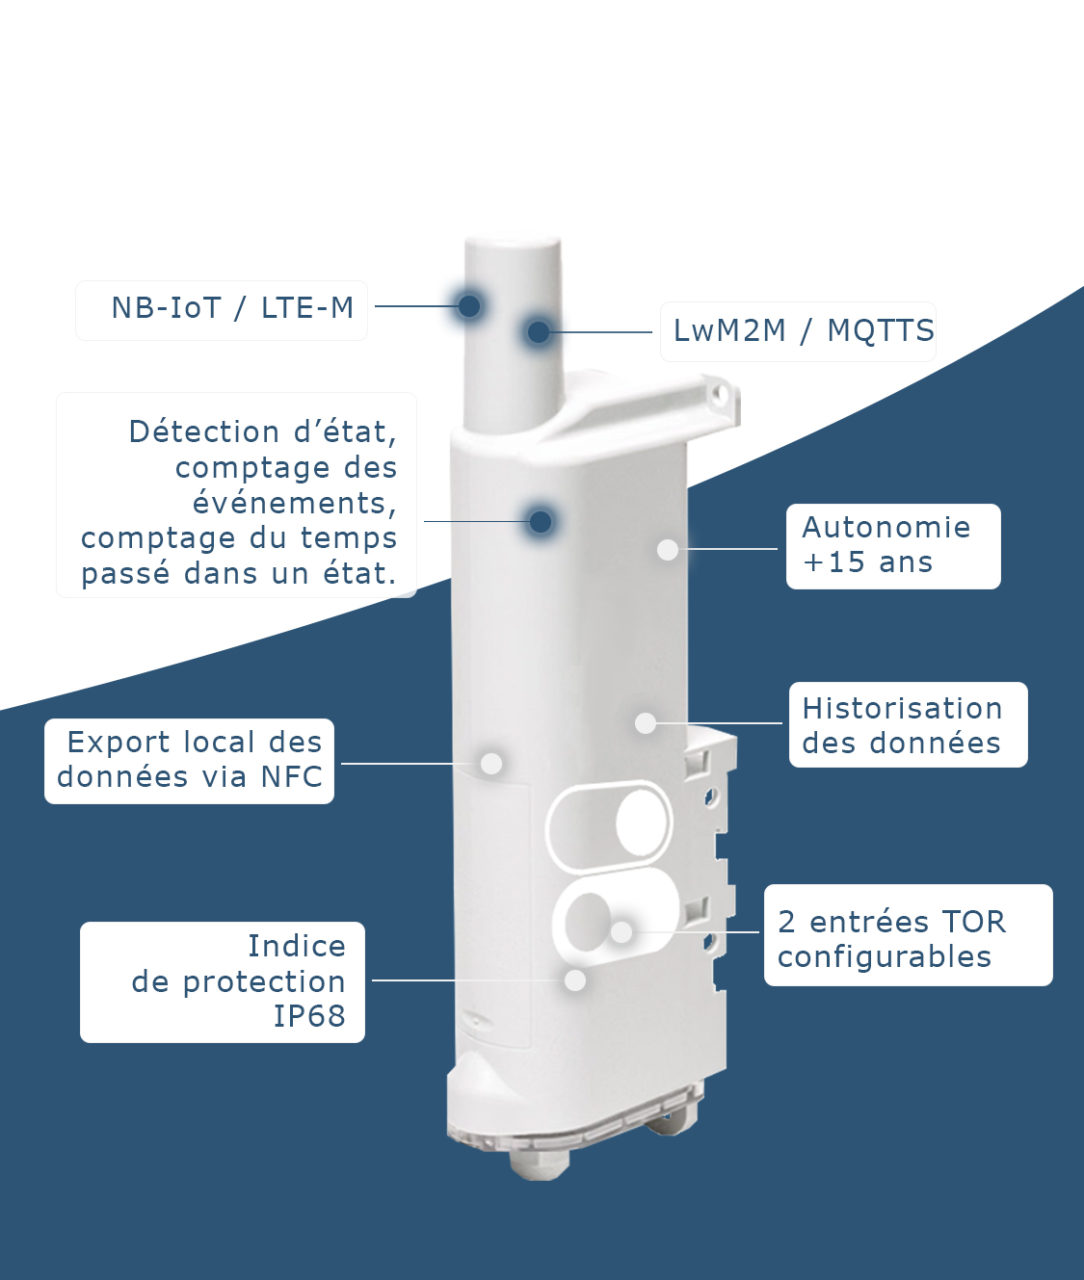
Preparing IoT sensors
CONFIGURE your IoT sensors
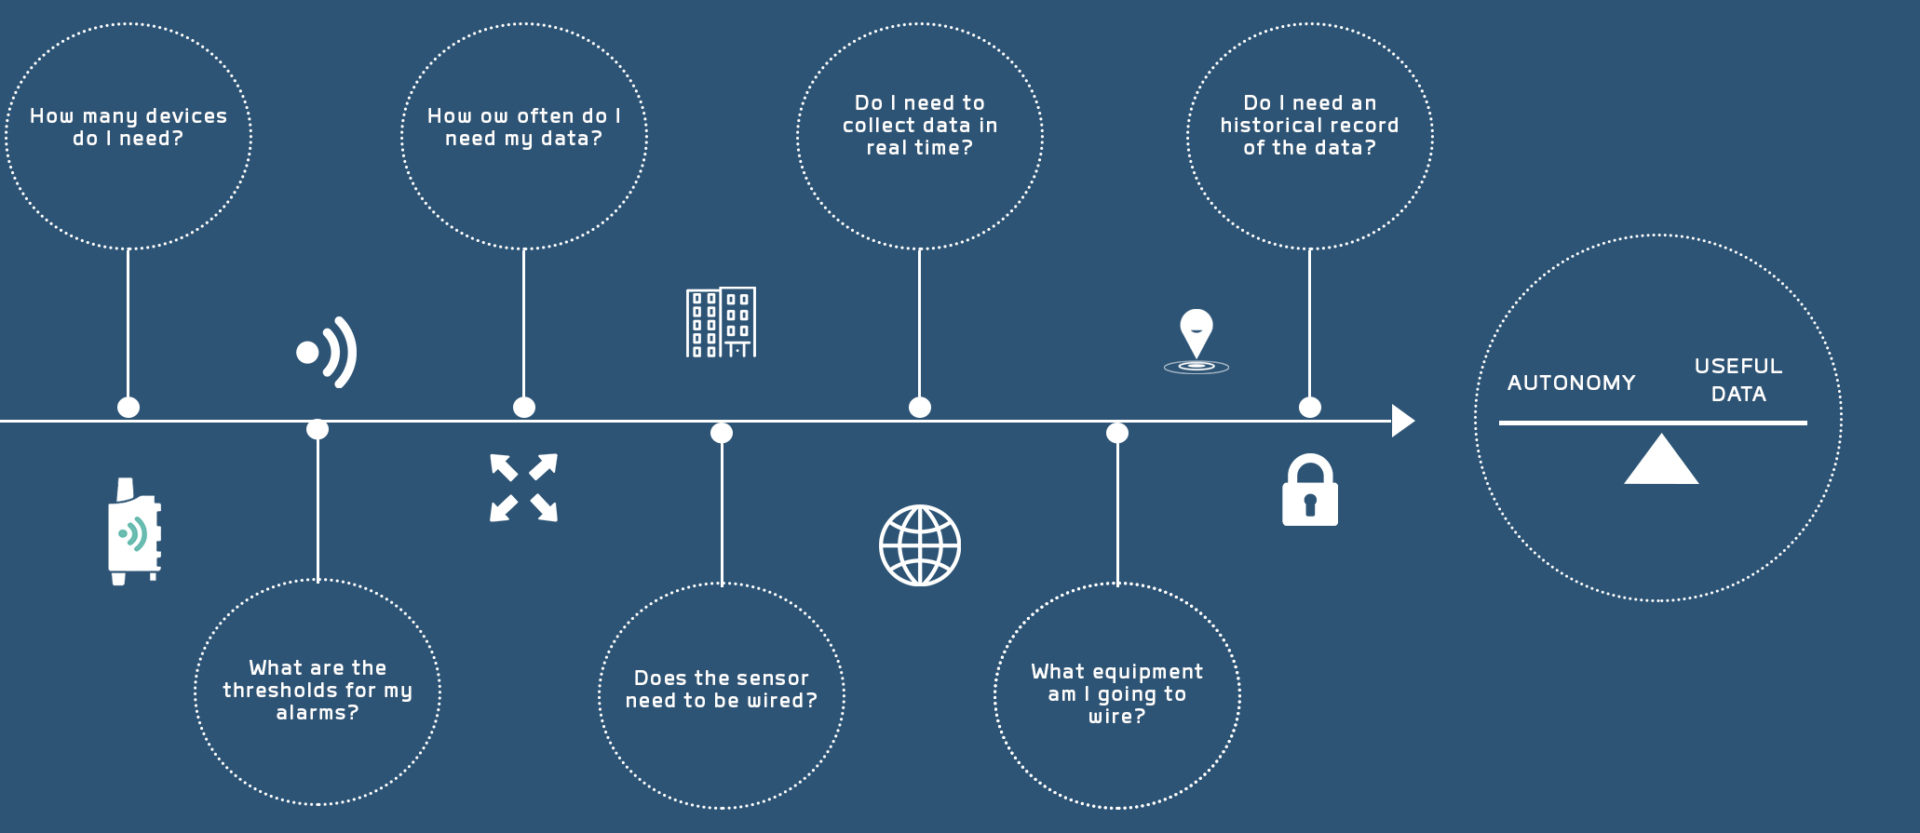
For installation it is now necessary to configure all its IoT sensors. It is important to make the configuration choices that will best meet the needs of the project. Making the right choices could boil down to finding the best balance between sensor autonomy and data useful to the project. Which configuration allows both the recovery of a necessary and sufficient amount of data while maintaining an autonomy compatible with the ROI objectives of the project?
Here are some questions to ask yourself when configuring your sensors:
- How many sensors do I need for my project?
- How often do I need to collect my data? Do I need this data quickly or is weekly data sufficient?
- Do I need to be informed in case of events? Which ones (thresholds, detection…)?
- Do the sensors need to be wired? If so, with what equipment? How should they be wired? What are the parameters of this equipment to be entered in my sensor (e.g. pulse weight)?
- …
Specific to each project, the answers to these questions will make it possible to evaluate the best configuration for your sensors and to identify the mechanisms to be implemented to meet your requirements (logging, redundancy, alarms, etc.).
To configure its sensors, there are 3 possibilities with the appropriate tools:

Adeunis application IoT Configurator
Android or Windows application, allowing the unitary update of the sensors via their Micro-USB port.

Adeunis Application KARE+
Via the KARE online platform which allows a single sensor update via the LoRaWAN or Sigfox networks, or via KARE+ manage the application for updating a fleet of sensors by air.

The IoT networks
Thanks to the adeunis documentation which describes how to address a DL frame to remotely reconfigure its sensors
Once configured the sensors can then be wired, for this refer to the corresponding section at the end of each Product User Guide.

On-site installation
IoT NETWoRK TEST
Now it is time to go to the field to install its sensors. For this step, the use of a network tester (type FTD) is strongly recommended to check and define the positioning of the sensors. In radio, the quality of the signal can vary from one meter to another and may or may not allow good communication.
RADIO THEORY RULES
Below are some theoretical recommendations for good radio communication:
As the radio has a circular emission around the antenna, we recommend to place the sensors vertically, at a height (at least 1.50m from the ground), away from the wall and from all surrounding materials that could block the emission (reinforced concrete, water, metal).

INSTALLATION OF IoT SENSORS IN PRACTICE
Here are some practical examples of successful installations:
Cold room
The materials making up a cold room can inhibit radio, so here the sensor was placed outside the room while the probe remained positioned inside.
Boiler room
In this boiler room, the sensors are positioned vertically on masts and the probes are as close as possible to the hot water pipes for a better measurement (clamp on the metal lug of the product, or positioning in a thermowell).
Meters
An important precaution to take when installing IoT sensors on meters: electrical cabinets or other metalic enclosures may inhibit radio, a closed-door test prior to installation with a network tester is mandatory.
Amphitheatre
In this amphitheatre, two temperature and humidity sensors were positioned at the top and bottom of the room (difference between the top and bottom can be up to 2°C). As they were not allowed to drill, the sensors were glued to the walls.

Boiler room
In this boiler room, the sensors are positioned vertically on masts and the probes are as close as possible to the hot water pipes for a better measurement (clamp on the metal lug of the product, or positioning in a thermowell).

Cold room
The materials making up a cold room can inhibit radio, so here the sensor was placed outside the room while the probe remained positioned inside.

Meters
An important precaution to take when installing IoT sensors on meters: electrical cabinets or other enclosures may inhibit radio, a closed-door test prior to installation with a network tester is mandatory.

Amphitheatre
In this amphitheatre, two temperature and humidity sensors were positioned at the top and bottom of the room (difference between the top and bottom can be up to 2°C). As they were not allowed to drill, the sensors were glued to the walls.
13/10/2020